Folding shirts can be a little challenging for some people. Sometimes the fold doesn’t look even or the shirts still come out wrinkled. Folding shirts can be simple and easy if you take the right steps towards folding shirts
Step 1: Lay the shirt flat
The first step is to take the shirt and lay it face down on a flat surface. If the shirt is longer at the bottom, you should grab grab it by the bottom and lightly shake the shirt so it’s evened out. But doing this, it will make the fold less wriggled, and easier for you to fold. After this, the shirt needs to be laid down. The front of the shirt faced down on a flat surface, while the sleeves are spread out.

Step 2: Folding the sides
Once, you lay the shirt flat, you can grab one of the vertical sides and fold it towards the center of the shirt. Usually some people don’t fold it to the center but that’s up to how you want your shirt to look towards the end. After doing this, you just need to do it to the same side. If the shirt is long-sleeved, take the top of the sleeve and fold that on top of your side fold (like picture shown below), so this way the sleeve won’t be wriggled and in the way of folding.

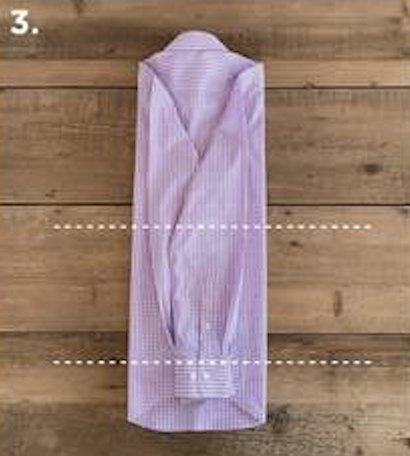
Step 3: Folding the end
The next step is to take the bottom of the shirt and only fold a little bit up. This will give you more room in wherever you are storing it and give the shirt less wriggles. Plus by doing so, the shirt will look more like a square, than a rectangle. I also like to do this because it gives the shirt a better crease, and gives me more room to store extra clothes in my dresser.
Step 4: Folding the shirt
The last step to folding a shirt is by grabbing the end of the shirt and bringing it just below the shoulder of the top. By putting it just below, you would not be able to see the bottom of the top, flaring out and it will give the shirt a better display. After this you will have a perfect folded shirt that is thin and thick enough for you to store more tops.